Showing posts with label Short Hair. Show all posts

How to Grow your hair 3-4 inches in 1 week!!

So First off you will need:
  • a glass or microwave proof cup
  • olive oil
  • a microwave
  • time
Got that? Okay now This is what you do:
  1. Put whatever the amount is of olive oil to cover you whole head and put it in the cup.
  2. Put the cup in the Microwave for 10 seconds or less (REMEMBER: if the oil is to hot you hair may fall out so make sure its touchable and slightly warm).
  3. Apply Olive Oil to roots and ends.
  4. This sounds silly but keep your head upside down for 4 minutes.
  5. After those 4 minutes sit up and keep the Olive Oil in for 2 hours.
  6. Last but not least Wash the Oil OUT! it may take a while to get it all out but it will get out soon enough!
There you're done! now do that for a Week and your hair will grow 3-4 inches:)
I did do it and only for 3 days because of swimming and it grew a 1 inch to a 1 inch in a half! So it does work!!You will be surprised!

Quick romantic hairstyle for short hair

Quick romantic hairstyle for short hair
Steps : 
Step 1. Using your curling iron, curl all over, being sure to direct the curls away from your face. Spritz with hairspray.
Step 2. Determine the placement of your headband and slip it over the crown of your head, pin into place.
Step 3. Starting from the front section, begin twisting and tucking sections of hair up and over the headband, it should start resembling a crown.
Step 4. Continue twisting and tucking, being sure to fill in any gaps.
Step 5. If you have very short hair in the back, use your comb to hold the hair in place while you blast with hairspray.
Step 6. Set the style with hairspray.

Tutorials You Should also see :

How To Make a Summer Hair Bun

Steps :
  • 1 : Brush your hair, if necessary straighten it.
  • 2 : Get an elastic band.
  • 3 : Make a high ponytail.
  • 4 : Get your bun donut :)
  • 5 : Place it over the ponytail.
  • 6 : Divide the tail into four strands.
  • 7 : spread one of the strands and fold it around the bun.
  • 8 : Take a bobby pin.
  • 9 : Secure the folded hair-strands with the bobby pin.
  • 10 : Make sure the back looks one, and style it up with a cute little bow! 

French Braid Bun Hairstyle

How To Style :
  • Step 1 : Tease the top of your hair a bit with a fine-tooth comb.
  • Step 2 : Start a braid, and add in pieces as you go {french braid the top portion of your hair}.
  • Step 3 : Pin the braid in place.
  • Step 4 : Scoop the rest of your hair into a high ponytail, pulling out a few pieces on either side to make it look a little more natural.
  • Step 5 : Tease the ponytail so it's thick and bushy. It forms into a bun much better like this.
  • Step 6 : Twist your hair around the ponytail holder, creating a big top knot ballerina bun.
  • Step 7 : Pin bun in place and hair spray!

The Faux Bob Hairstyle

How To Style :
  • Step 1 : This style works on a variety of textures, however, and can look great on straight, wavy, dirty or clean hair.
  • Step 2 - 3 and 4 : Impart your desired texture. To achieve a bouncier, looser feel, curl your hair with a 1 inch iron in fairly large sections.
  • Step 5 : Create desired base at scalp. A bit of backcombing sometimes makes the faux bob a bit more believable.
  • Step 6 : Gather the hair gently into the ponytail, you don’t need to really brush the hair back or smooth it at all, just secure it together.
  • Step 7 - 8 : Tuck and secure the ponytail. I rolled the ponytail underneath Sarah’s hair and pinned it to her scalp. The ponytail makes pinning that amount of hair much simpler. I used 3-4 bobby pins during this step.
  • Step 9 : Secure any loose bits.
  • Step 10 : Adjust the form. I used an old fashioned lift, which can be purchased at Sally Beauty Supply for under $1. In the photo, I’m lifting up the backcombing and creating our desired bob-like full shape.
  • Step 11 - 12 : Add some Hairspray and admire.

Make a Diy Wedding Hair

How to Style:
1. This first look starts with a ponytail at the back of the head, leaving out some hair from the sides and back.
2. Reach through the top of the base of the ponytail, grab the ends and pull it through to create the topsy tail.
3. Make two smaller ponytails below and to the side of the first, including the hair from the first ponytail, but still leaving a bit out at the nape.
4. Topsy tail them!
5. Then make a ponytail with the remainder of the hair at the nape, and topsy tail it.
6. Tuck the ends of the final ponytail under and gently pin them into place.
7. Loosen up the look by gently pulling it apart a bit. Secure with hairspray and add a flower or jewel to garnish if you wish.

Tutorials You Should also see :
How to Make a Hair Bun for Your Wedding

How to do a fishtail braid

Fishtail braids look harder than normal braids, but if you think of them as two ponytails it’s really simple to do.
Steps :

1. Put your hair in a ponytail. Once you’re more practiced, you can skip this step, but it’s a must to keep this braid in place, especially if you have layers cut in your hair.
2. Split your ponytail in two. Hold one side in each hand and keep these separate as you braid.
3. Cross a small section from the left to the right. Take a small piece of hair from the left side of the left ponytail and put it in the right ponytail.
4. Repeat on the right. Take a small piece of hair from the right side of the right ponytail and put it in the left ponytail.
5. Repeat this process all the way down the ponytails. Each time, cross a small piece of hair from one ponytail to the other side. As you move down the ponytail they cross over, forming the fishtail braid.
6. Tie the end and stretch it out. Secure the end of your fishtail braid with a small, clear elastic. Gently pull at the sides of the braid to stretch it out. This makes your hair look thicker and fuller, and emphasizes the shape of the braid.

Tutorials You Should also see :


How To Make Braided Bun

How To Make Braided Bun


Tutorials You Should also see :


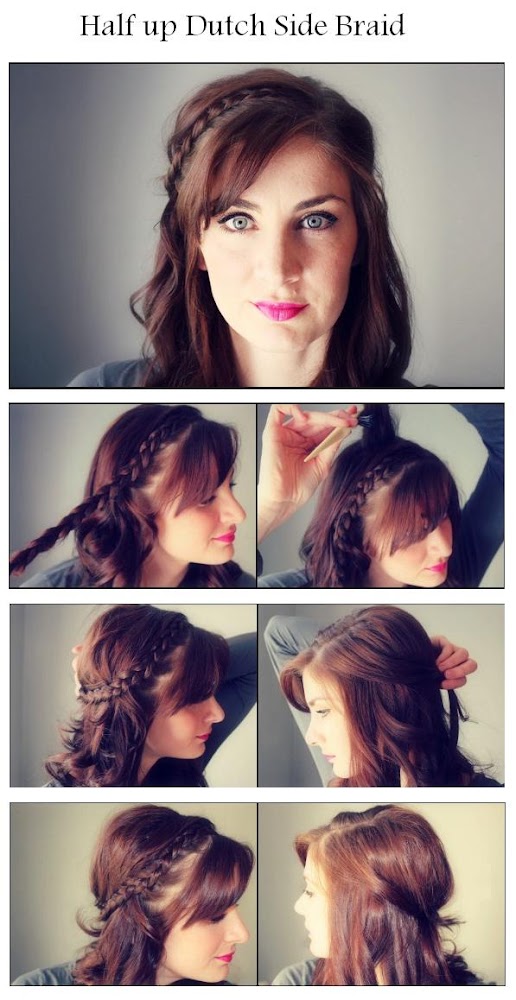
Make A Half up Dutch Side Braid

Make A Half up Dutch Side Braid


Tutorials You Should also see :

How To Make Side Braided Hairstyle

Steps :
Step 1: Brush your hair – you want to remove any knots or tangles before you start to braid.
Step 2: Start on the right (or left if you prefer!) – I’ll explain as if you’re on the right, but pick whichever side you part your hair. Take a large section above your right ear and split into three.
Step 3: To make a Dutch braid, cross the right piece under the centre section. Then bring the left piece under the right.
Step 4: Next add more hair to each section as you braid. Try to add in even amounts on both sides so you keep the braid shape equal.
Step 5: Keep braiding, bringing the right section under the centre, and the left under the right. When you run out of hair to add in, bring your right hand around to the front and braid to the end of your hair.
Step 6: Secure the braid with a small clear elastic and then stretch out your braid.


Tutorials You Should also see :

Loose And Soft Wavy Up-do Tutorial

How To Style :
  • Step 1 : Use styling cream through out hair to added hold and texture.
  • Step 2 : Set the hair in pin curls using a curling wand, set for 30 minutes.
  • Step 3 : Lightly finger comb the curls.
  • Step 4 : pull the hair to one side, leaving partial down and secure with a hair bungee.
  • Step 5 : once the hair is tied, pull a large section of hair under the bungee hair band.
  • Step 6 : softly pull some texture pieces out so the hair looks loose and soft.
  • Step 7 : grab sections of the remaining partial hair and twist, then overlay it around the hair band.
  • Step 8 : secure with hair spray and bobby pins.
Tutorials You Should also see :

Make A Braid Headband For Your Hair

Steps :
  • Step 1 : Start with a straight . Clip up a section on one side parallel with the arch of your eyebrow.
  • Step 2 : Loosely braid the section, keeping the braid loose for length.
  • Step 3 : Wrap the braid around to the other side of your head.
  • Step 4 : Use One or two bobby pins to secure braid behind ear.
  • Step 5 : To create extra volume at the crown, gently tease and smooth with a brush.
Tutorials You Should also see :
  • All Braid Hairstyles

Make Short Hair Without Cutting Your Hair

Steps :
1. Divide your hair into two sections, from one ear to another.
2. Pin up the top section, just to keep it out of the way.
3. Pull the bottom section into a ponytail. 
4. Twist the pony tail into a small bun and pin flat against your head.
5. Now unpin the top section, begin dividing it into small strands.
6. Fold the strands in half and pin them up underneath, try your best to hide the bobby pins!
7. Once you've pinned all the strands, carefully use a curling iron to flip the strands out just a little. This will make them look more natural.
8. Add any accessories or pin any loose pieces and you're done!


Tutorials You Should also see :

Make the side chignon for your hair

how to do the side chignon hair style Tutorial

Tutorials You Should also see :


How to Curl Your hair using rags

You'll need some cut fabric strips, a comb and some water.

How to :
  1. First, dampen the bottom of your hair.
  2. Next, separate a section of hair and twist it around one strip of fabric.
  3. Then, tie the fabric strip in place and repeat until the entire bottom section of your hair is rolled.
  4. After that, all you have to do is sleep on your rag rolls and remove them in the morning for pretty curls!
Tutorials You Should also see :

Retro Faux Bob Hairstyle

As perfect as a Stepford wife, as ice cool as Betty Draper, as vintage as yesteryear and as modern as tomorrow, 2012's faux bob hairstyle gives the year a structured, pristine, ‘done’ hairstyle that borrows much from the 60s fashion revival. her is a tutorial on how to make this look your own.

Tutorials You Should also see :


Make A Chignon For Your Hair

Make A Chignon For Your Hair

Tutorials You Should also see :

Make Ponytail With Bandana

Make Ponytail With Bandana

Make Wist Headband And Braid

Make Wist Headband And Braid

Tutorials You Should also see :

Chignon Hairstyle With Side Waves

As seasons change, hairstyles are given new twists. This year the always dependable chignon gets reinvented. In this take, it gets a sweeping side part with soft waves on one side, creating a unique effect that varies with the angle you view it from.

Tutorials You Should also see :