the Beehive

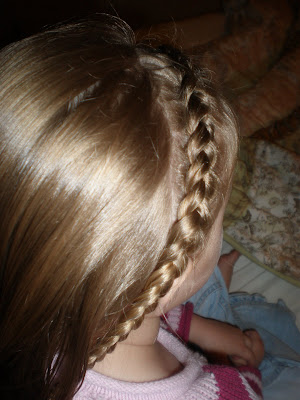
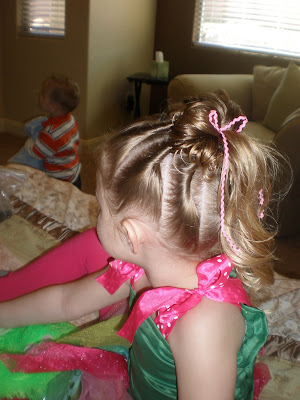
I don't know why I didn't take pictures for each step - but you get the idea with the few that I have. It kind of looks like a beehive so that's what we're going to name it today. I realize I've done a lot of braiding lately, especially inside-out french braiding. It's just so fast & easy for me to do & so many options. So if you haven't learned how to do it yet - watch the video tutorial below & for those who have - keep practicing because it gets easier everytime.

I've still had quite a few people email me or comment asking how to do the flower bun. Once again, if you click on the labels list, click on "Tutorials" & scroll down until it gives the step by step picture directions of how to do it. Hope that helps those who are still confused!!

I parted the hair all the way around the head, like a headband. What was left in the middle I pulled into a pony tail so I would not include it in my braid. Then I started inside-out french braiding at the front where we normally would part her hair. Braid all the way around the head, making a complete circle.
It was really easy to do, I just had to manuever my body around hers since she likes to sit in one place. When you get to the end, keep braiding to the ends of the hair.

I brought the hair that was left in the middle to a high side pony. Then did our messy bun on top.

I added a bow to the side pony (sorry I didn't take it right after I put it in - this is the best you get but you get the idea)


inside-out frenchbraid tutorial

Here's the Inside-Out Tutorial I said I would post. Once again - don't mind the voice - yep still hate it when I hear it on here. Hope it helps. If any of you still have questions - don't hesitate to ask. I hope you can see well enough my hands are kind of in the way. Someone needs to tell my husband he needs to learn how to film better:) But it works!!

This is what the braid should look like when you are finished:

quadruple french braids

This is just a fun little twist on your 2 french braids. 
First, part the hair in the front & inside-out french braid all the way down. 
Do the other side the same. 
I did a zig-zag part & then started about an inch down just inside-out french braiding. When you get to the bottom, connect the two braids together. Do the same on the other side. 
Once you've finished, I connected the two braids at the base of the head so that the first braid wasn't distracting & moving around alot. It would be cute to add a bow there. 
You're finished!!

Fish Tail Flip


Start by sectioning the front of the hair where you will start the fish tail braid. 
You are going to fish tail braid the hair & pull the pieces from the sides (like you would a french braid) instead of just the sectioned part. It's super easy. Just pull a piece from the side & cross it over, continuing until you've gone down as far as you want. 
This is what it should look like. Section it off with an elastic. 
Pull the rest into a pony, including the fish tail. FISH TAIL BRAID the pony tail. 
Flip it up & secure with an elastic, having the ends stick out of it. 
I added some ribbon & then sprayed the ends with there stick out & rolled the hair over my fingers to give it a flipped look with the ends (instead of having to pull out my curling iron). That's all there is to it. 

A Fancy UpDo

My little girlie went to a Fancy Nancy party last week & got to dress up in fancy clothes so I decided she had to have fancy hair with it. 
Start by sectioning out the hair & twisting it straight back. Add a bobby pin going forward to secure it. 
Go all the way around the head, sectioning, twisting & adding your pins. Then pull it all into a pony tail. 
Start to pin the hair by doing the flower bun.  But leave a portion out so that it hangs down underneath. 
I blow dried & curled what was hanging down
For her ribbon, I tied a bow & then put the bobby pin through the middle of it & insert it in the hair where you want it to go. 
Add the ribbon & spray to hold. We added glitter in her hair for some extra "fanciness". 
from the front: 

tucked under buns

I've had a few people ask for me to show a video doing the messy buns or other things. If you look to the right at the list "labels" & click on tutorials, it will show you all of the videos I have done so far, which has the messy buns on it. 

So for today - here's what we came up with: 
The part is a little different from what I normally would do. Instead of a zig-zag part, make it look like boxes. Pull into pigtails. 
Tuck under the pigtails, going the opposite way that you normally would, so the hair sits on top of the knot. 
Then start pinning the pigtails under so you don't see any of the ends. 
Spread the hair with your fingers & spray to hold.